You can download JASPA binaries from http://forge.osor.eu/projects/jaspa/
To install JASPA you must follow the instructions of one of the following sections depending on your backend database (PostgreSQL or H2) and your Operating system (Windows or Linux i386).
Create a new directory c:\jaspa4h2 and extract the
jaspa4h2_win.zip file into this new
directory.
After extracting the file you should see something like:
c:\jaspa4h2\lib
c:\jaspa4h2\bin
c:\jaspa4h2\sql
c:\jaspa4h2\doc
c:\jaspa4h2\jre
It can be done in two different ways:
a) Copying files in System folder
Copy the files in the path c:\jaspa4h2\bin\ to your windows system directory. If your system directory is c:\windows\system32 then you will have:
c:\windows\system32\h2.bat
c:\windows\system32\h2console.bat
c:\windows\system32\h2script.bat
c:\windows\system32\h2runscript.bat
c:\windows\system32\shp2jaspah2.bat
c:\windows\system32\jaspah22shp.bat
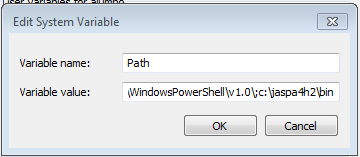
b) Adding a Directory to the Path
Alternatively, you can setup the system PATH variable to point
out to c:\jaspa4h2\bin. To change the system
environment variables, follow these steps:
Right-click My Computer and click Properties
In the System Properties window, click on the Advanced tab.
In the Advanced section, click the Environment Variables button.
Finally, in the Environment Variables window, select the Path variable in the Systems Variable section and click the Edit button. Each different directory is separated with a semicolon (;). Append the following path to the end of Path variable:
;c:\jaspa4h2\bin
Open a command prompt shell and run the following command:
h2
![[Note]](images/note.png) | |
Depending on your firewall configuration, a confirm pop up could ask if you want to allow the connection, click Yes |
Result of starting the H2 server:

In this step you are going to create a new database
(myfirstjapadb) and to execute the file jaspa.sql
into it to make it spatial. Open a command prompt shell and run the
following command:
h2runscript -url jdbc:h2:tcp://localhost/~/myfirstjaspadb -user sa -password 123 -script c:\jaspa4h2\sql\jaspa.sql -showResults
You can use any H2 client. We are going to use the default H2 client. Open a command prompt shell and run the following command:
h2console
An Internet browser should open, and you have to set up the connection parameters with the following values:
| Parameter | Value |
|---|---|
| Saved settings | Generic H2 (Server) |
| Setting name | Generic H2 (Server) |
| Driver Class | org.h2.Driver |
| JDBC URL | jdbc:h2:tcp://localhost/~/myfirstjaspadb;SCHEMA_SEARCH_PATH=PUBLIC,JASPA |
| User Name | sa |
| Password | 123 |
| |
The character ~ is an alias of the user directory.
|
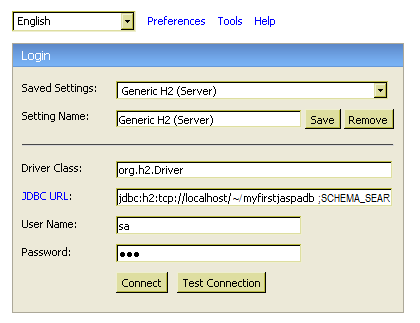
Once you have connected to the H2 Web Client, you should see something similar to the next screenshot.
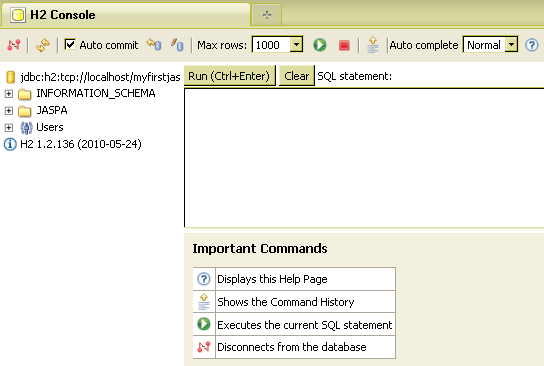
To check that your installation was successful you can use the following SQL sentence.
SELECT jaspa_full_version();
--Jaspa should return something like that ->
JASPA (JAva SPAtial) For H2="0.1 RC1" JTS="1.11.0 forjaspa" GeoTools="2.7-M1" JRE="1.6.0_18"
This how-to will install the H2 server too. Do not worry, if you have already installed it, it is harmless.
For this step you will need root privileges.
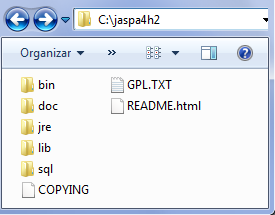
Create a new directory /opt/jaspa4h2/ . Extract the
jaspa4h2_i586.tar.gz file into this new
directory.
After the extraction, you should see something like:
/opt/jaspa4h2/lib
/opt/jaspa4h2/bin
/opt/jaspa4h2/sql
/opt/jaspa4h2/doc
/opt/jaspa4h2/jre
In a shell (with root privileges), run the following commands:
ln -s /opt/jaspa4h2/bin/shp2jaspah2 /usr/bin/shp2jaspah2
ln -s /opt/jaspa4h2/bin/jaspah22shp /usr/bin/jaspah22shp
ln -s /opt/jaspa4h2/bin/h2 /usr/bin/h2
ln -s /opt/jaspa4h2/bin/h2console /usr/bin/h2console
ln -s /opt/jaspa4h2/bin/h2script /usr/bin/h2script
ln -s /opt/jaspa4h2/bin/h2runscript /usr/bin/h2runscript
In this step, you are going to create a new database
(myfirstjapadb) and to execute the file jaspa.sql
into it to make it spatial.
In a shell run the following command:
h2runscript -url jdbc:h2:tcp://localhost/~/myfirstjaspadb -user sa -password 123 -script /opt/jaspa4h2/sql/jaspa.sql -showResults
You can use any H2 client. We are going to use the default H2 client. Open a command prompt shell and run the following command:
h2console
An Internet browser should open, and you have to set up the connection parameters with the following values:
| Parameter | Value |
|---|---|
| Saved settings | Generic H2 (Server) |
| Setting name | Generic H2 (Server) |
| Driver Class | org.h2.Driver |
| JDBC URL | jdbc:h2:tcp://localhost/~/myfirstjaspadb;SCHEMA_SEARCH_PATH=PUBLIC,JASPA |
| User Name | sa |
| Password | 123 |
| |
The character ~ is an alias of the user directory.
|
Once you have connected to the H2 Web Client, you should see something similar to the next screenshot.
To check that your installation was successful you can use the following SQL sentence.
SELECT jaspa_full_version();
--Jaspa should return something like that ->
JASPA (JAva SPAtial) For H2="0.1 RC1" JTS="1.11.0 forjaspa" GeoTools="2.7-M1" JRE="1.6.0_18"
This how-to assume that PostgreSQL is already installed on your computer. If it is not true then proceed to download and install PostgreSQL for windows (the one click installer) from: http://www.postgresql.org/download/windows
This installation procedure is a little bit long mainly because you have to install PLJava under PostgreSQL as you can see later. Once PLJava is installed you just have to repeat the short steps 6 and 7 to create a new JASPA spatial database.
| |
If you are using Windows VISTA, make sure that User Account Control (UAC) is turned off through user accounts. |
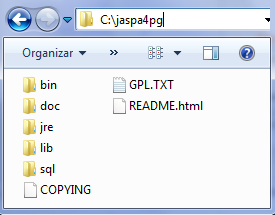
Create a new directory c:\jaspa4pg .
Extract the jaspa zip file into this directory,
jaspa4pg8.4_win.zip (if your PostgreSQL version
is 8.4) jaspa4pg8.3_win.zip (if your PostgreSQL
version is 8.3).
After extract the file you should see something like:
To change the system environment variables, follow these steps:
Right-click My Computer and click Properties.
In the System Properties window, click on the Advanced tab.
In the Advanced section, click the Environment Variables button.
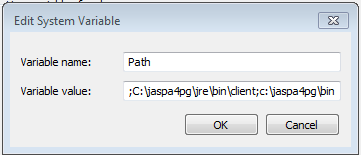
Finally, in the Environment Variables window, select the Path variable in the Systems Variable section and click the Edit button. Each different directory is separated with a semicolon (;). Append the followings paths to the end of Path variable:
;C:\jaspa4pg\jre\bin;C:\jaspa4pg\jre\bin\client;c:\jaspa4pg\bin;C:\jaspa4pg\jre\bin\server
| |
You must not delete or overwrite the paths that are already in the Path variable! Also, make sure you don't have an extra "\" at the end of the paths |
Optional: if the PostgreSQL/bin path is not included in the Path variable is a good idea to include it too. For that, you have to find out where is PostgreSQL installed on your computer (e.g C:\Program Files\PostgreSQL\8.4\bin or C:\Program Files\PostgreSQL\9.0\bin)
Locate the file postgresql.conf . It is
located under the directory data, on your PostgreSQL cluster
installation Example: C:\Program
Files\PostgreSQL\8.4\data\postgresql.conf
Open the file jaspa4pg/doc/html/pgconf-wint.txt and add its content to the end of the postgresql.conf file. Lines to be added
Stop and start the PostgreSQL server service to re-read the
postgresql.conf file (Start Button / All Programs
/ Postgresql 8.4 / Stop Service & Start Button / All Programs /
Postgresql 8.4 / Start Service)
Open a command prompt shell Run each of the following commands (the system will ask you the postgresql password):
createdb -U postgres jaspatemplate
psql -U postgres -f C:\jaspa4pg\sql\pljavainstall.sql -d jaspatemplate
psql -U postgres -f C:\jaspa4pg\sql\jaspa.sql -d jaspatemplate
Now you have a jaspa template ready to create easily as many new jaspa spatial database as you want. Let's create our first jaspa spatial database called myfirstjaspadb
createdb -U postgres -T jaspatemplate myfirstjaspadb
To check everything is fine you can use the following SQL sentence. Connect to the new database using any postgresql client (psql, pgadmin3, etc.) and execute:
SELECT jaspa.jaspa_full_version();
--Jaspa should return something like that ->
JASPA (JAva SPAtial) For PostgreSQL="0.1 RC1" JTS="1.11.0 forjaspa" GeoTools="2.7-M1" JRE="1.6.0_18"
This how-to assume that PostgreSQL is already installed on your computer. If it is not true then proceed to download and install PostgreSQL from http://www.postgresql.org/download
This installation procedure is a little bit long mainly because you have to install PLJAVA under PostgreSQL as you can see later. Once PlJava is installed you just have to repeat the short steps 6 and 7 to create a new jaspa spatial database.
For this step you will need root privileges Create a new directory /opt/jaspa4pg .
Extract to this new directory the jaspa tar file,
jaspa4pg8.4_i586.tar.gz (if your PostgreSQL
version is 8.4) or jaspa4pg8.3_i586.tar.gz (if
your PostgreSQL version is 8.3).
After extracting the file you should see something like:
/opt/jaspa4pg/lib
/opt/jaspa4pg/bin
/opt/jaspa4pg/sql
/opt/jaspa4pg/doc
/opt/jaspa4pg/jre
Locate the file postgresql.conf. The
location of this file depends on your Linux distribution and how your
PostgreSQL server is configured. For instance,
in OpenSUSE 11.2, it can be found in:
/var/lib/pgsql/data/postgresql.confin Ubuntu (9.10 and 10.04), it can be found in:
/etc/postgresql/8.4/main/postgresql.conf
Edit the postgresql.conf file, with root privileges, by adding to the end of it the content of the file jaspa4pg/doc/html/pgconf-i586.txt. Lines to be added
Edit the file ld.so.conf , with root user
privileges, located in /etc/ld.so.conf and add the following lines at
the end of it.
/opt/jaspa4pg/jre/liblink
/opt/jaspa4pg/jre/liblink/client
/opt/jaspa4pg/jre/liblink/server
/opt/jaspa4pg/jre/liblink/native_threads
In a shell, run the following commands:
ldconfig
ln -s /opt/jaspa4pg/bin/shp2jaspapg /usr/bin/shp2jaspapg
ln -s /opt/jaspa4pg/bin/jaspapg2shp /usr/bin/jaspapg2shp
With root user privileges: Stop and start the PostgreSQL server service:
OpenSUSE:
open Yast, go to System / System Services (Runlevels) , select the postgresql service and press disable (wait the server to stop) and Press enable (wait the server to start).
Ubuntu:
System / Administration / BootUp-Manager
(if you do not have this tools installed in your ubuntu distribution, you can install it easily using synaptic package manager)
Activate the check box about postgresql server. Apply the changes
Generic Linux:
/etc/init.d/postgresql start
/etc/init.d/postgresql stop
Open a command prompt shell Run each of the following commands (the system will ask you the postgres password):
createdb -U postgres jaspatemplate
psql -U postgres -f /opt/jaspa4pg/sql/pljavainstall.sql -d jaspatemplate
psql -U postgres -f /opt/jaspa4pg/sql/jaspa.sql -d jaspatemplate
Now you have a jaspa template ready to create easily as many new jaspa spatial database as you want. Let's create our first jaspa spatial database called myfirstjapadb.
createdb -U postgres -T jaspatemplate myfirstjaspadb
To check everything went fine you can enter into the new database using any postgresql client (psql, pgadmin3, etc.) and execute the following sentence:
SELECT jaspa_full_version();
--Jaspa should return something like that ->
JASPA (JAva SPAtial) For PostgreSQL="0.1 RC1" JTS="1.11.0 forjaspa" GeoTools="2.7-M1" JRE="1.6.0_18"
JASPA for PostgreSQL and for H2 stores spatial functions and metadata tables into the schema jaspa.
PostgreSQL
In PostgreSQL the schemas to look in is automatically specified
in the postgresql.conf file.
H2
In H2 database you can specify the schema to look in with the connection parameter JDBC URL. For instance:
- JDBC URL
jdbc:h2:tcp://localhost/~/myfirstjaspadb;SCHEMA_SEARCH_PATH=PUBLIC,JASPA
If you leave out "SCHEMA_SEARCH_PATH=PUBLIC,JASPA", you have to indicate that jaspa spatial functions are located in the schema jaspa. Example:
SELECT jaspa.ST_IsClosed(jaspa.ST_GeomFromText('LINESTRING (0 0, 10 20, 30 20,0 0)'));or alternatively, you can set the schema_search_path parameter in each session:
SET SCHEMA_SEARCH_PATH=PUBLIC,JASPA;
SELECT ST_IsClosed(ST_GeomFromText('LINESTRING (0 0, 10 20, 30 20,0 0)'));Use the command 'shp2jaspapg' (PostgreSQL) o 'shp2jaspah2' (H2), the same way you use 'shp2pgsql' in PostGIS. Please refer to Section 3.2, “Shp Converter” for further information.
PostgreSQL. The way to create an spatial index is slightly different: use the function ST_PGBox
create index idx_puntos_funcion on puntos using gist (ST_PGBox(geom));
The use of spatial indexes is the same in PostGIS and Jaspa4PG - select count(*) from puntos p1, puntos p2 where (p1.geom && p2.geom);
H2 does not support spatial indexes at this moment. Please refer to Section 7, “Spatial indexes” for further information.
The versioning system is based on 3 values. Jaspa a.b.c version.
Depending on the previous and new Jaspa version, the installation process will be different. It explains how to update a spatial database. Although not necessary, it is always advisable to made before a backup.
It is necessary to remove Jaspa intallation directories and install it from scratch.
If we have a Jaspa spatial database it is necessaty to update it. If we have a Jaspa template, we must create it again.
Update an existing database:
Execute the before_upgrading_from_X.X.sql script in your database:
psql -U <user> -f before_upgrading_from_a.X.sql <database>
The before_upgrading_from_X.X.sql file is located in the folder sql of the installation.
That script deletes all the functions except those that are referenced in a check restriction of a tables or a trigger.
Execute the after_upgrading_to_X.X.sql script in your database:
psql -U <user> -f after_upgrading_to_a.X.sql <database>
For instance if we upgrade a database called mydatabase from version 0.2 to 1.1 we must execute:
psql -U postgres -f before_upgrading_from_0.2.sql mydatabase
psql -U postgres -f after_upgrading_to_1.1.sql mydatabase
It is necessary to unzip a patch inside the Jaspa installation directory. It will update the necessary files.
If we have a Jaspa template, we must update it or create it again. If we have Jaspa spatial databases it is necessaty to update them.
Update an existing database:
Execute the before_upgrading_from_X.X.sql script in your database:
psql -U <user> -f before_upgrading_from_X.X.sql <database>
The before_upgrading_from_X.X.sql file is located in the folder sql of the installation.
That script deletes all the functions except those that are referenced in a check restriction of a tables or a trigger.
Execute the after_upgrading_to_X.X.sql script in your database:
psql -U <user> -f after_upgrading_to_X.X.sql <database>
For instance if we upgrade a database called mydatabase from version 0.2 to 0.3 we must execute:
psql -U postgres -f before_upgrading_from_0.2.sql mydatabase
psql -U postgres -f after_upgrading_to_0.3.sql mydatabase
It is only necessary to unzip a patch inside the Jaspa installation directory. It will update the necessary files (usually the jaspa.jar file, or some other files, update documentation, etc.)
In any case, there is no need to reinstall or upgrade spatial databases of the previous version.
It is always advisable to make backup copies periodically.
Backup files can be created in text or binary format. In this section it is explained how to make a backup of a Jaspa spatial database, and restore the data into a new database:
Text Format
Create the backup file:
pg_dump -U [user] -b -Fp -N jaspa -N sqlj <database_name> > <backup_file>
Example. Backup the database "mydb":
pg_dump -U postgres -b -Fp -N jaspa -N sqlj mydb > /tmp/mydb.backup
Optional. Create a new spatial database createdb -U <user> -T <jaspatemplate> <db_name>
Example. Create a new spatial db named "mydb2"
createdb -U postgres -T jaspatemplate mydb2
Insert the backup file psql -U <user> -f <backup_file> <database_name>
psql -U postgres -f /tmp/mydb.backup mydb2
Fill the metadata table GEOMETRY_COLUMNS: select probe_geometry_columns();
Example. Login in the database mydb2, and execute the function probe_geometry_columns():
psql -U postgres mydb2
mydb2=# select probe_geometry_columns();
Binary Format
Alternatively the backup can be created in binary format. Thus, the backup file is smaller but to load it the order pg_restore must be used (instead of psql -f)
Create the backup file:
pg_dump -U [user] -b -Fc -N jaspa -N sqlj [database_name] > [backup_file]
Example backup of the database "mydb":
pg_dump -U postgres -b -Fc -N jaspa -N sqlj mydb > /tmp/mydb.backup
Optional. Create a new spatial database createdb -U <user> -T <jaspatemplate> <db_name>
Example. Create a new spatial db named "mydb2"
createdb -U postgres -T jaspatemplate mydb2
Insert the backup file pg_restore -U <user> -d <database_name> <backup_file>
pg_restore -U postgres -d mydb2 /tmp/mydb.backup
Fill the metadata table GEOMETRY_COLUMNS: select Probe_Geometry_Columns();
Example. Login in the database mydb2, and execute the function probe_geometry_columns():
psql -U postgres mydb2
mydb2=# select probe_geometry_columns();
![[Warning]](images/warning.png) | |
The backup throws errors like: ERROR: language "java" already exists ERROR: language "javau" already exists ERROR: language "plpgsql" already exists ERROR: schema "topo" already exists these errors are normal and should be ignored. If the process gives any other error then it should be analyzed. |
Create the backup file:
shell> h2script -url <jdbc_url> -user sa -password 123 -script <zip_file> -options compression zipLoad the backup file:
shell> h2runscript -url <jdbc_url> -user sa -password 123 -script <zip_file> -options compression zip
The database where we load the script must not be spatially enabled.
h2script -url jdbc:h2:tcp://localhost/~/myfirstjaspadb -user sa -password 123 -script /tmp/test.zip -options compression zip

h2runscript -url jdbc:h2:tcp://localhost/~/u2 -user sa -password 123 -script /tmp/test.zip -options compression zip
For building JASPA you will need a build tool called maven. You can get it from:
Maven - http://maven.apache.org/
Maven is a build tool that is going to help sort all of this stuff out. You may be used to using ant, or sticking to the safe confines of your IDE. If so, bear with me for a moment as we set up a simple maven project. I think you will find this tool makes things much easier. You can check to see if you have the command line Maven utility installed and, if so, the version as follows:
shell:> mvn -version

Apache Maven 2.2.1 (rdebian-1)
Java version: 1.6.0_18
Java home: /usr/lib/jvm/java-6-openjdk/jre
Default locale: en_US, platform encoding: UTF-8
OS name: "linux" version: "2.6.32-21-generic" arch: "i386" Family: "unix"
I am using Java 1.6 above; and Maven 2.2.1. You can use Java 5 if you like; currently JASPA is developed against Java 1.5.
Notes:
If you are using the Netbeans IDE for development then the command line Maven utility is optional because there is support for Maven within the IDE. The notes below refer to Netbeans version 6.7.1.
Windows and OSX users can download and install maven from apache: http://maven.apache.org/download.html
Linux users can install maven using the package managers as Synaptic (ubuntu) or YAST (open suse). Alternatively the Linux users can either download from the maven web site or use apt-get:
apt-get maven
You can find a more detailed maven installation help in the book “Maven: By Example. An Introduction to Apache Maven” from Sonatype. Chapter 2. This book is licensed under a Creative Commons license and can be downloaded for free from: http://www.sonatype.com/books/mvnex-book/reference/public-book.html
Unpack the file jaspasrc.zip in your user or home directory (actually any directory in which you have write permissions will work). You will get a directory structure as:
.../jaspa/distro.../jaspa/srd.../jaspa/pom.properties.../jaspa/pom.xml
Open a console and change the directory to:
.../jaspa
Run the following commands in order to upload the JTS and pljava jars to your local maven repository:
mvn install:install-file -DgroupId=org.postgresql -DartifactId=pljava -Dversion=1.4.2 -Dpackaging=jar -Dfile=distro/source/libsnomvn/pljava.jar

mvn install:install-file -DgroupId=com.vividsolutions -DartifactId=jts -Dversion=1.11m -Dpackaging=jar -Dfile=distro/source/libsnomvn/jts-1.11m.jar
The first time you run the mvn command, maven will download all the required files to work itself so do not worry if you see a lot of maven messages. After running the mvn commands the last messages should be something like that:
…
…
[INFO] ------------------------------------------------------------------------
[INFO] Building jaspa
[INFO]    task-segment: [install:install-file] (aggregator-style)
[INFO] ------------------------------------------------------------------------
[INFO] [install:install-file {execution: default-cli}]
[INFO] Installing /home/alumno/Documents/jaspa/distro/source/libsnomvn/jts-1.11m.jar to /home/alumno/.m2/repository/com/vividsolutions/jts/1.11m/jts-1.11m.jar
[INFO] ------------------------------------------------------------------------
[INFO] BUILD SUCCESSFUL
[INFO] ------------------------------------------------------------------------
[INFO] Total time: < 1 second
[INFO] Finished at: Thu Jul 08 09:45:28 PDT 2010
[INFO] Final Memory: 4M/7M
[INFO] ------------------------------------------------------------------------From the same directory run:
mvn clean install
If everything is working well then maven will download all the required jars and will build JASPA. You should get a '[INFO] BUILD SUCCESSFUL' message as before.
Maven will have created a jaspa/target directory where the jaspa jar will be located.
You just have to copy this file into the jaspa binaries distribution (c:\jaspa4pg\lib and c:\jaspa4h2\lib in MS Windows; /opt/jaspa4pg/lib and /opt/jaspa4h2/lib in Linux).
This document is based on the Geotools QuickStart document. http://docs.geotools.org/stable/userguide/quickstart.html
To use Eclipse IDE with JASPA project you have several alternatives.
Using a maven command to prepare the eclipse project. This solution is easier but simple.
Using the maven plugin m2eclipse. This solution requires to install a eclipse plugin but it is more complete than the previous one.
You can set up eclipse to understand the maven jars repository.
Eclipse users now need to set things up for the IDE. Run the following command:
.../jaspa mvn eclipse:eclipse
This command will create the files .../jaspa/.classpath and .../jaspa/.project with all the required jars for Eclipse to build the JASPA project.
You can now give Eclipse the background information it needs to talk to your “maven repository”.
Start up Eclipse
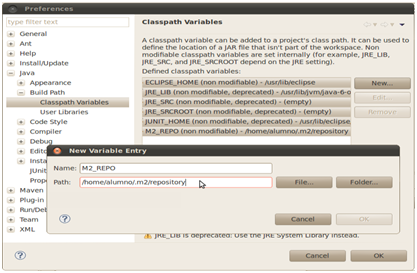
Open up the Windows > Preferences menu
Navigate to the Java > Build path > Classpath Variables preferences page
Add an M2_REPO classpath variable pointing to your “local repository” (in your home directory):
Windows XP:
C:\Documents and
              Settings\.m2\repository
Windows Vista and Windows 7:
C:\Users\<your_user>\.m2\repositoryLinux and Mac:
~/.m2/repository
Select the File > Import menu
Choose General > Existing Projects into Workspace, and press Next
Select the root directory .../jaspa
Finish
| |
If you change any maven dependency then you should update the
mvn eclipse:eclipse |
You can find a more detailed m2eclipse installation help in the book “m2eclipse: Maven integration for Eclipse” from Sonatype, chapter 2. This book is licensed under a Creative Commons license and can be downloaded for free from: http://www.sonatype.com/books/m2eclipse-book/reference/
Start up Eclipse
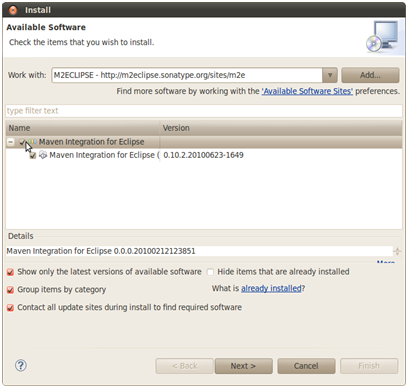
Select Help > Install New Software. The install dialog should appear.
Press the add button.
Now you have to enter the name and location of the m2eclipse repository.
- name:
m2eclipse
- location:
http://m2eclipse.sonatype.org/sites/m2e
In the work with Box, it should appear the new repository. Chose the component listed 'Maven Integration for Eclipse (required)'.
Click Next. Eclipse will show if there are any issues.
Click Next to agree the license.
Click Finish to start the installation.
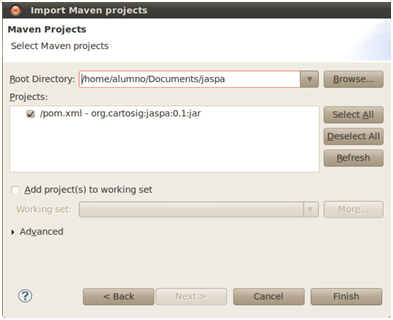
Now you have to import the Maven Project into the Eclipse IDE.
Select File > Import
In the import dialog chose: Maven > Existing Maven project
Select the directory which jaspa is installed: .../jaspa
Eclipse should detect automatically the file /pom.xml
Press the Finish button